A working Framework Laptop 13 mainboard can become a small desktop in the dedicated Cooler Master Mainboard Case while retaining its existing processor, cooling assembly, compatible memory and SSD. The enclosure is only part of the conversion. You also need a suitable USB-C power arrangement, external display and input devices, and a complete audio or network solution for whichever functions you want to retain.
The most easily missed parts are small: the audio-board cable, wireless antennas and bracket, a USB-C Expansion Card reserved for power, and the mounting screws stored inside the rubber stand. Inventory those before ordering replacements. This is a reuse plan for a known-working Laptop 13 module, not a way to make an unknown faulty board usable merely by putting it in a transparent box.
Confirm That the Old Board Is Ready to Work Outside the Laptop
Framework’s quick-start guide requires the mainboard to have the latest BIOS and Standalone mode enabled before use outside a Framework Laptop. Confirm those prerequisites on the original machine, or have them resolved through the appropriate service route, before treating the board as ready for the case. Buying the enclosure does not perform that preparation.
Start with a board you can identify and whose operation is already established. Keep its original heatsink, heatpipe and fan together with the module. This conversion is not a reason to replace the laptop cooling assembly with an ITX tower cooler or add an ATX power supply: it uses the Laptop 13 board’s own hardware and USB-C power route.
The product is specifically the Framework Laptop 13 Cooler Master Mainboard Case. Framework’s guide describes Laptop 13 generation compatibility, but that wording does not make every board sold under the Framework name a fit. Match your exact board and case revision, particularly when the board is newer than the guide’s illustrated hardware. A Framework Desktop mainboard is a different purchase and belongs to a different enclosure plan.
Keep the old laptop intact until the readiness checks, replacement-parts list and data backup are settled. That avoids discovering after removal that the one setting you needed to confirm was easier to address in the original machine.
Count the Case Hardware, Including the Screws Hidden in the Stand
Framework’s guide lists the case with eight preinstalled T5 fasteners, a rubber desk stand, a Wi-Fi retaining bracket, three smaller fasteners for the wireless bracket and audio board, and four VESA mounting screws. A T5 screwdriver, such as the Framework screwdriver, is needed for the case.
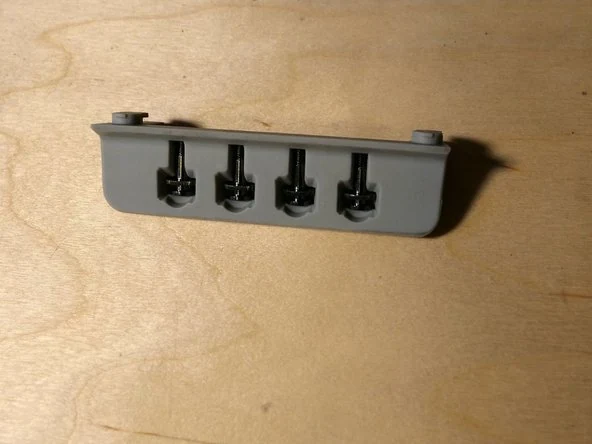
Look underneath the rubber stand before marking the four VESA screws missing. The photograph shows them stored in the stand itself. This is a useful detail when inspecting a used case: the seller may have retained the stand but overlooked the hardware it contains, or may be selling the enclosure without the stand altogether.
Ask for both case halves, the full set of case fasteners and the small fittings needed for your chosen configuration. A top cover and bottom tray do not constitute a complete wireless-and-audio installation if their brackets, screws or connecting parts are absent.
Distinguish included mounting hardware from the mount you intend to use. The guide’s four VESA screws support attachment to a 100 × 100 mm VESA bracket; they do not establish that such a bracket comes with the case. The desk stand and an actual monitor-mounting bracket are different inventory items.
Keep the Original Cooling, Memory and Storage as a Matched Module
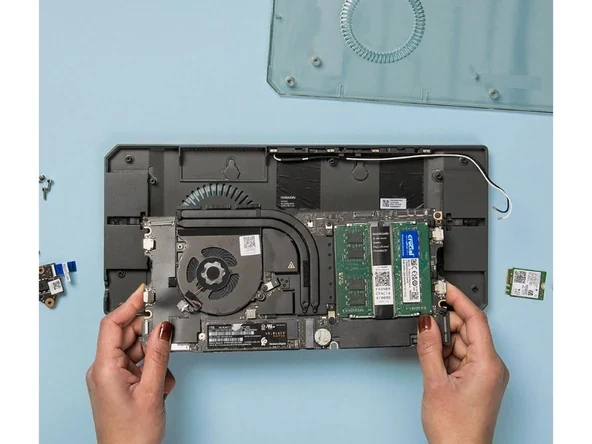
For an owner moving the same working mainboard, its already compatible memory and SSD are the natural first candidates to retain. The guide specifically calls for checking that storage and memory are installed before closing the case. Do not interpret an enclosure purchase as including either component.
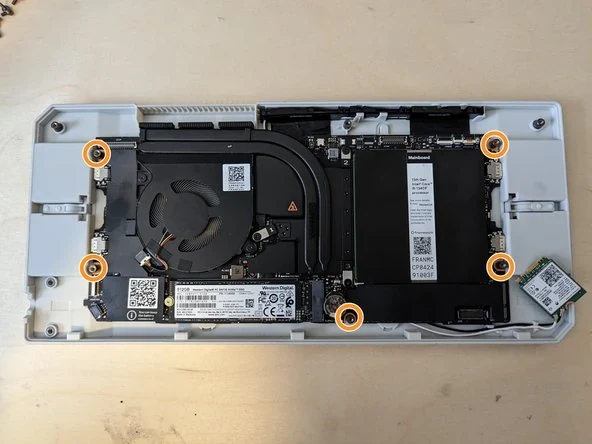
The placement photograph shows the original cooling assembly and SSD location, along with the case’s alignment posts. Its memory slots are empty in that particular illustration. Use it to understand positioning, not as evidence that a desktop can run in that pictured state. Your actual board needs its appropriate memory installed.
Retain memory that is compatible with your existing board. This does not establish that modules from a different Laptop 13 generation are interchangeable, or that any advertised capacity will work. If you are changing memory or storage at the same time, resolve that component’s compatibility separately instead of transferring an old generation’s assumptions to a different board.
The case accepts the mainboard by aligning its holes with the posts shown in the guide. Framework says there are no fasteners to tighten at that placement stage; the final enclosure closure comes later. Do not purchase or improvise extra board screws merely because the board is initially resting on posts.
The laptop battery is not connected in this case arrangement. Nor does the conversion preserve the original laptop’s built-in display, keyboard or touchpad as desktop peripherals. Plan an external screen, keyboard and pointing device, including their required cables and ports, rather than counting the old laptop’s complete user interface as part of the transferred module.
Reserve USB-C Power Before Allocating the Other Ports
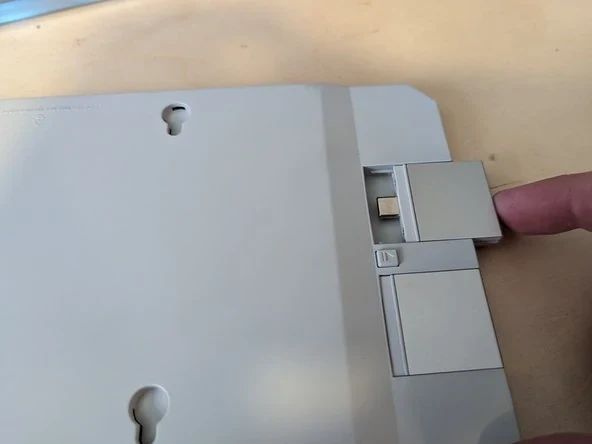
Framework recommends at least one USB-C Expansion Card for power. Put that card in the inventory before choosing the rest of the desktop’s connections. The guide shows the familiar Expansion Card insertion arrangement in the Cooler Master case, rather than a new set of fixed desktop motherboard ports.
The power recommendation matters because the battery is absent. Framework explains that a laptop normally supplements adapter power with battery power, whereas this case configuration does not. Its guide recommends a minimum 60 W adapter and discusses higher-power adapters supporting up to 100 W to maximize performance. Treat that as the documented power-selection range, not a promise that every workload consumes 100 W or that a higher printed wattage alone guarantees a result.
Check the USB-C adapter and its power cable together. An old phone charger or a cable described only as “USB-C” is not enough information to approve the arrangement. Establish that the adapter and cable provide the power delivery required by the actual board and the guide’s recommendation. Retain an existing appropriate setup when it meets that need; a new case does not automatically require buying another power brick.
Now allocate the remaining Expansion Cards and connections to the display, keyboard, mouse, storage accessories and network choice. Check which functions the exact board supports at each position rather than assuming every opening provides identical display, data and power capabilities. A physical card fitting the case does not answer all of those questions.
For example, an Ethernet Expansion Card uses a connection you might otherwise have assigned to another peripheral. A USB-C power card is also a deliberate allocation. Write the actual port plan before ordering a selection of cards that individually look useful but leave no convenient connection for the screen or input devices.
Complete the Wireless Chain from the Antenna to the Bracket
If you want internal Wi-Fi, Framework calls for a compatible M.2 wireless card and either the Framework Laptop 13 antenna assembly or an appropriate SMA antenna arrangement with matching cables. The radio card alone does not supply the antennas or their path through the case.
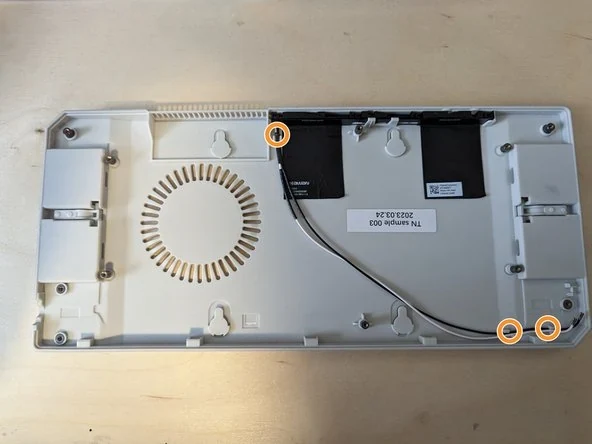
The original antenna route is visible in the photograph: the antenna patches sit against the case edge, and the leads follow the guides beneath the mainboard. Fit and route those parts before the board covers the path. The case’s molded guides are useful because they show where the wires belong; they are not a reason to trap a loose cable under a board or lid.
The guide also shows holes for SMA antennas as an alternative to the original antenna assembly. If you choose that route, match the external antenna hardware, cable assembly and wireless card’s miniature connector. Its reference to U.FL/MHF4 cables is not permission to treat different connector types as interchangeable. Identify the actual mating parts before buying a harness.
Retain the correct card bracket as well. Framework distinguishes the metal bracket supplied with the case, which uses one of the three smaller fasteners, from a newer plastic bracket with its fastener incorporated. Check which arrangement you have instead of assuming the same loose screw inventory applies to both.
Follow the wireless card’s connection markings when attaching its leads. Framework warns that the small connectors are fragile and should be aligned before pressure is applied. A photograph of black and white leads can help identify the intended route, but it does not justify forcing a mismatched connector onto the card.
If you intend to use an Ethernet Expansion Card instead, make that a deliberate alternative and keep the required card and cable in the port plan. You do not have to buy internal wireless parts merely to fill the optional spaces in the enclosure.
Retain the Headphone Connection with the Audio Board and Cable
To use the case’s Laptop 13 audio-board arrangement, you need the compatible Framework Laptop 13 Audio Board and its flat connecting cable. The transparent enclosure does not create an audio jack by itself. Inventory the small board and cable together; retaining only one leaves the connection unfinished.
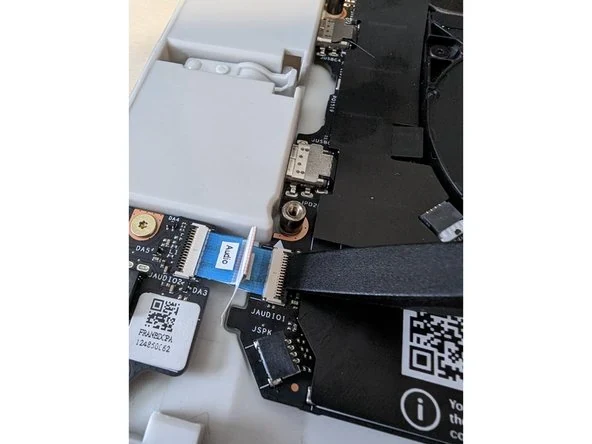
Framework mounts the audio board in the lower-left area of the case with two of the three small PCB fasteners. The cable connects it to the mainboard beside the original cooling assembly. The photograph makes this separate piece of hardware visible, so it is easier to distinguish from a jack soldered directly onto the mainboard.
The original instructions show lifting the connector’s black latch, inserting the flat cable until its white line is nearly at the connector edge, then closing the latch. Cable presence and seating both matter. When checking a used kit, ask for the cable and inspect its ends rather than assuming the board’s label proves the connection is complete.
Match the audio parts to the actual mainboard revision. This is not a universal laptop audio-board conversion, and the case does not include a pair of laptop speakers simply because the old machine had them. If you already have an appropriate supported USB audio solution and prefer it, account for its USB connection and establish its compatibility; do not buy an unrelated audio dongle just to avoid identifying the original missing part.
Close the Case and Check the External Power Button
Before closure, confirm memory, storage, antenna routing and the selected optional boards are in place. Framework’s guide closes the enclosure using the eight case fasteners and warns against overtightening: stop once resistance is felt. The opening instructions also say to remove Expansion Cards if the halves do not separate easily. Do not force the shell around cards or trapped wiring.
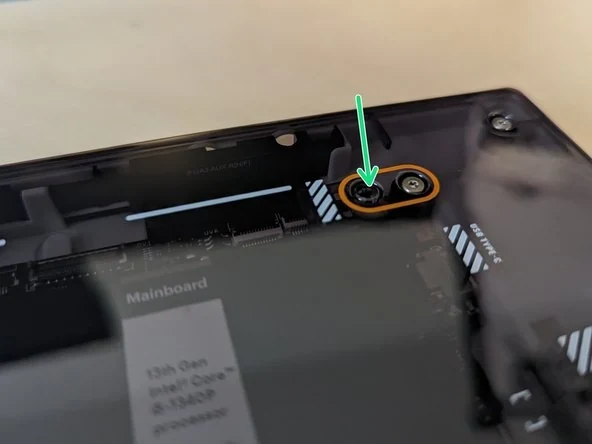
The power button is next to one of the case fasteners, as highlighted in the original close-up. With the board correctly positioned and the cover fitted, check that the external button operates the board’s intended switch. Correct alignment is part of a usable enclosure, not an accessory to omit from the final check.
If the board runs while accessible but the closed case’s button does not operate it, keep that enclosure alignment issue unresolved rather than calling the conversion finished. Return to the documented positioning and closure arrangement. The purchase plan should not depend on leaving the lid off or adopting an unverified modification.
Choose the Desk Stand or a Suitable VESA Mounting Arrangement
The supplied rubber desk stand pushes into the two lower holes on the rear of the case. The photograph shows its relationship to the circular ventilation area. Keep the stand when you want the upright desktop arrangement, and leave the fan openings clear rather than pressing the case against an obstruction.
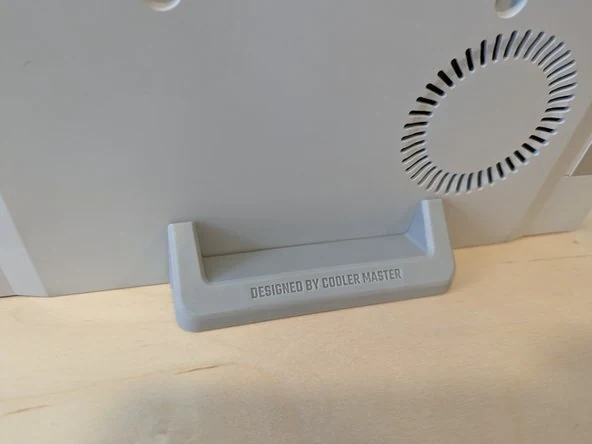
For mounting behind a display, the guide identifies the four screws stored in the stand and a 100 × 100 mm VESA bracket. Check the actual bracket, display mounting arrangement and supported load before treating this as a complete solution. Matching hole spacing is only one part of mounting a computer securely.
Include cable routing and button access in that choice. A mount that blocks the power button, obstructs cooling or leaves a USB-C power connector under strain has not delivered the convenient desktop you intended. Check those relationships with your chosen bracket and cables, rather than assuming a photograph of a bare rear panel proves the finished arrangement works.
You can defer the VESA purchase if the supplied desk stand already suits the intended position. Conversely, buying a used case without the stand may remove both the upright support and its stored screws from the package. Count the parts for the mounting option you actually intend to use.
Resolve the Clock and Operating-system Details Separately
Framework’s guide notes that some boards, including the 13th Gen Intel and Ryzen 7040 examples it names, may lack an installed RTC battery. If you want the system clock retained after external power is disconnected, establish the appropriate RTC arrangement for your exact board.
The guide’s old statement that an RTC battery would appear in the marketplace “soon” is not a current availability promise. Check the appropriate compatible part and instructions if that function is needed. Do not turn a clock-retention question into a soldered battery modification or assume every reused board has the same RTC hardware.
Back up the existing SSD before moving the module. If retaining its operating-system installation, confirm the board’s supported drivers, configuration and licence situation for the desktop use you intend. A different plastic enclosure does not by itself establish support for a new operating-system version or guarantee that every external peripheral works.
Finish with the Gaps That Apply to Your Actual Module
Use the inventory to distinguish equipment you already have from parts that still need identification:
| Assembly | Retain when complete | Resolve before use |
|---|---|---|
| Mainboard module | Known-working Laptop 13 board, its cooling, compatible RAM and SSD | Required BIOS and Standalone preparation; exact case compatibility |
| Enclosure | Both halves, eight T5 fasteners, chosen stand or mount fittings | Missing fasteners, button alignment or unsuitable mounting arrangement |
| Power and ports | Suitable USB-C adapter, cable and power Expansion Card | Guide’s power recommendation and remaining display, input and network connections |
| Internal wireless | Compatible radio, appropriate antennas, cables and retaining bracket | Any missing or mismatched connector, lead or mounting piece |
| Original audio route | Compatible audio board, flat cable and two PCB fasteners | Missing cable, incorrect board revision or incomplete seating |
| Desktop use | Display, keyboard, pointing device and chosen network | Required cables, supported software and any desired clock-retention provision |
For example, an owner with the complete working module, original audio parts, suitable power equipment and retained wireless hardware may primarily need the enclosure and its fittings. The extra work is identifying that the antenna assembly, cable and bracket really are present—not automatically buying a second set of everything.
A second owner may have a working bare module with RAM and SSD but no audio cable, no antenna assembly and no spare USB-C power card. That is a different purchase list. Choose the intended audio and network routes, then obtain their complete parts and reserve the power connection. Calling that package “mainboard plus case” hides the very items most likely to delay first use.
Buy against the resolved list, not the attractiveness of the transparent lid. Once the working module, complete case, suitable power, external peripherals and chosen audio/network arrangement all have a clear destination, the old laptop board becomes a practical desktop reuse project.