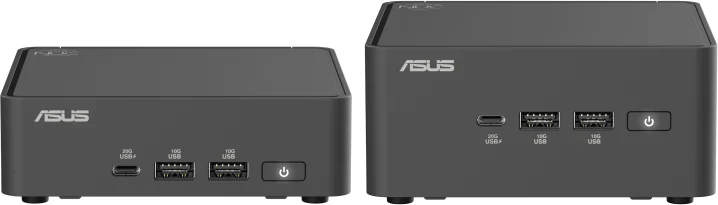
Choose the slim NUC15CRK-B Kit when its standard 2280 plus 2242 NVMe arrangement fits your retained drives and you do not need the tall model's internal expansion accessories. Choose the tall NUC15CRH-B Kit when you need an optional second 2280 drive arrangement or an appropriate LAN/COM module. The tall model's storage expansion uses the existing 2242 slot: it changes the second drive's supported length rather than adding a third SSD.
The processor choice matters separately. The main 2280 connection is PCIe Gen 5 x4 with Core Ultra, but Gen 4 x4 with Core processors. Both Kits need you to supply memory, SSDs and an operating-system installation. Case height, processor, drive lengths and the actual accessory package belong on one shopping list.
1. Start with the Kit Identity, Then Choose the Height
ASUS lists five product columns: NUC15CRK and NUC15CRH as Mini PCs, NUC15CRK-B and NUC15CRH-B as Kits, and NUC15CRB as a board. A listing headed only “NUC 15 Pro” does not tell you which package you are buying. Check the complete part number and the seller's included configuration.
| Product form | Memory and storage | Operating system |
|---|---|---|
| Kit | Neither included at shipment | No preinstalled OS |
| Mini PC | Selected supplied configuration | Listed Windows Home/Pro configurations |
| Board | Bare-board product; not the complete enclosed Kit | No preinstalled OS |
The two Kits share a 117 × 112mm footprint. The slim CRK-B is 36.8mm high; the tall CRH-B is 54mm high. The title image shows that physical difference, with slim at left and tall at right. More height buys room for the specified expansion arrangements, not an automatic extra drive or included expansion module.
Choose the exact processor configuration before treating the retained parts as compatible. Core Ultra and Core versions appear under the same family name but do not give the main SSD the same PCIe generation. The power-adapter grouping also differs by exact CPU, rather than following a simple tall-versus-slim rule.
2. Match Retained SODIMMs or CSODIMMs to the Actual Configuration
The Kits have no memory supplied. ASUS's current specification lists up to 96GB, using two 48GB DDR5 SODIMMs or two 48GB DDR5 CSODIMMs. The V3 guide requires 1.1V, non-ECC memory and lists DDR5-5200/5600 SODIMMs and DDR5-6400 CSODIMMs.
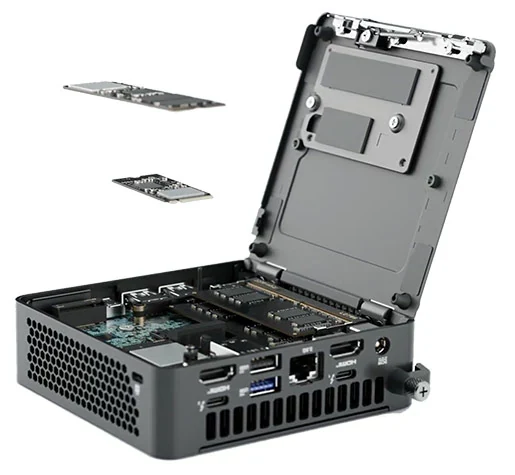
That gives you two published memory routes, not permission to treat every compact DDR5 module as identical. Check the exact retained modules against ASUS's qualified list for the selected system. An ordinary desktop DIMM or CUDIMM is not the specified compact module format. Nor should a SODIMM's old overclocked setting be counted as a guaranteed operating speed after migration.
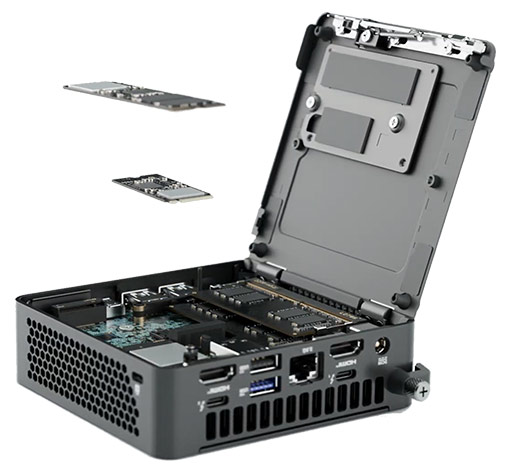
The opened-chassis manufacturer view helps locate the memory and storage area. It illustrates access to the hardware; the fitted components in that image do not change the Kit's empty-at-shipment specification. A spare pair of suitable modules can reduce the replacement list, but the pair still needs its own capacity, type and compatibility check.
Do not assume that mixing one SODIMM with one CSODIMM forms a validated pair. ASUS describes two SODIMMs or two CSODIMMs for the maximum configuration. Its specification also conditions Intel Arc graphics on using two memory modules; check that condition when choosing a Core Ultra configuration for its integrated graphics. It is not a gaming-performance promise.
One small-print detail deserves attention when reusing older modules: the manual excludes 2Gb, 4Gb and 8Gb SDRAM device densities. Those bit-density figures are not the same as the module's capacity in GB. Do not reject or accept an 8GB module solely from that number; identify the actual part and validated configuration.
3. the Standard Two-drive Plan Uses Different SSD Lengths
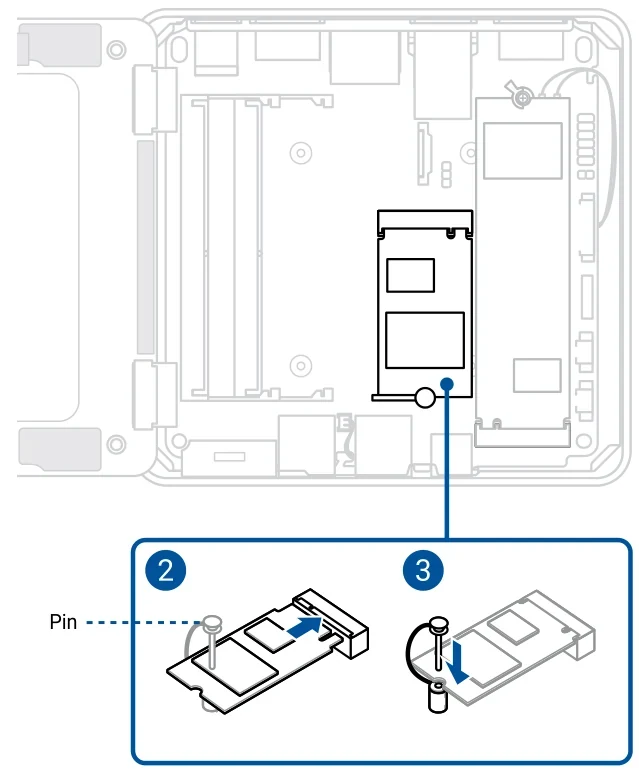
Both case heights have a primary M.2 2280 Key M NVMe position and a secondary M.2 2242 Key M NVMe position. The shorter drive position is not another native 2280 mounting location. The V3 diagram shows the 2242 position and its pull-up anchor pin, which differs from the primary drive's Q-Latch arrangement.
| Processor family | Main 2280 position | Second 2242 position |
|---|---|---|
| Core Ultra | Up to PCIe Gen 5 x4 | Up to PCIe Gen 4 x4 |
| Core | Up to PCIe Gen 4 x4 | Up to PCIe Gen 4 x4 |
ASUS currently lists 128GB–8TB for the main 2280 position and 128GB–2TB for the 2242 position. Match the actual SSD model, protocol, dimensions and supported capacity to its assigned connection. The main-slot maximum should not be copied onto every optional accessory.
For example, an owner retaining one 2280 NVMe drive and one 2242 NVMe drive has a documented two-position layout to evaluate in either Kit. Check those exact drives rather than assuming that a Gen 5-capable primary connector requires buying a new SSD. An owner retaining two 2280 drives has a different problem: the second long drive does not fit the stock 2242 arrangement merely because both use NVMe.
The documented storage positions are NVMe. An M.2 SATA drive or a cabled 2.5-inch SATA drive does not transfer into those positions. Do not infer a legacy 2.5-inch drive bay from the word “tall”; choose the CRH-B for its actual documented expansion options.
4. the Tall Kit Can Trade Its Short Position for a Second 2280
The optional 2280 M.2 expansion is purchased separately and applies to NUC15CRH models. The V3 guide states that the 2242 slot is used for this expansion. The adapter-position drawing makes the dependency visible: the expansion board goes into the short M.2 connection before the long SSD is secured in the expansion arrangement.
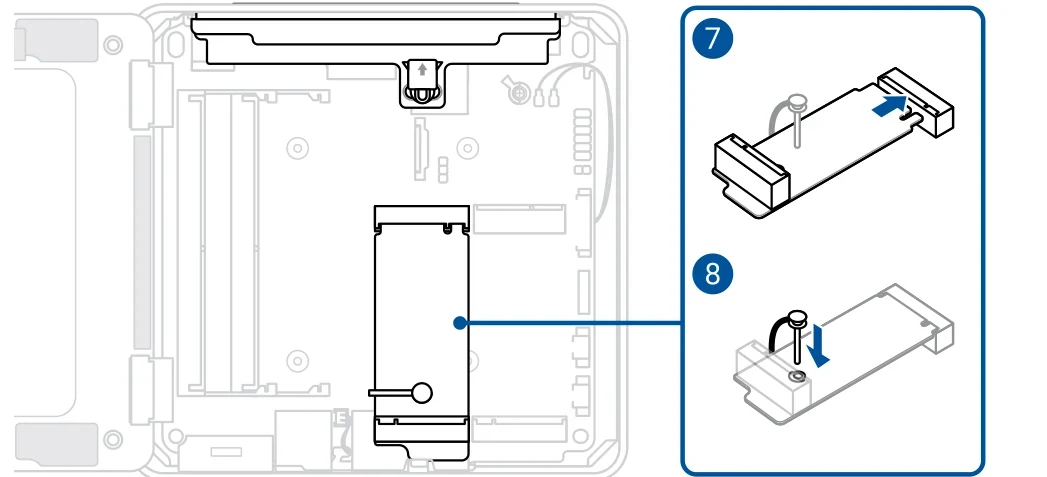
The resulting additional 2280 connection is PCIe Gen 4 x4. Selecting a Core Ultra Kit does not make this second long-drive path Gen 5. The original main 2280 position keeps its CPU-dependent specification; the secondary path changes from a short drive to an expansion-mounted long drive.
| Desired retained drives | Suitable layout to evaluate | Purchase consequence |
|---|---|---|
| 2280 plus 2242 | Standard positions in either height | No storage expansion needed for those lengths |
| Two 2280 drives | Tall Kit, main position plus optional expansion | Buy the correct complete expansion accessory |
| 2280 plus 2242 plus another 2280 | Not the documented expansion layout | Adapter consumes the 2242 position; this is not three SSDs |
Do not budget only for an unspecified M.2 adapter. ASUS's installation uses an expansion board, metal bracket and the appropriate rear faceplate arrangement. The manual also includes changes to the M.2 heatsink stand screws. Confirm that the accessory package contains the parts needed for that installation and supports the intended SSD.
This matters when comparing a slim Kit with a tall listing. The tall case alone does not provide the second long-drive assembly. Price the Kit and its correct expansion accessory before deciding that keeping a second 2280 SSD saves money.
5. Treat LAN and COM Expansion as Specific Module Choices
The tall chassis has a removable rear faceplate below the standard connectors. The manual shows separate installation arrangements for optional LAN expansion and optional LAN-and-COM expansion, both purchased separately. They involve the rear opening and an internal flexible flat cable; the LAN-and-COM arrangement also connects a COM-port cable to the motherboard.
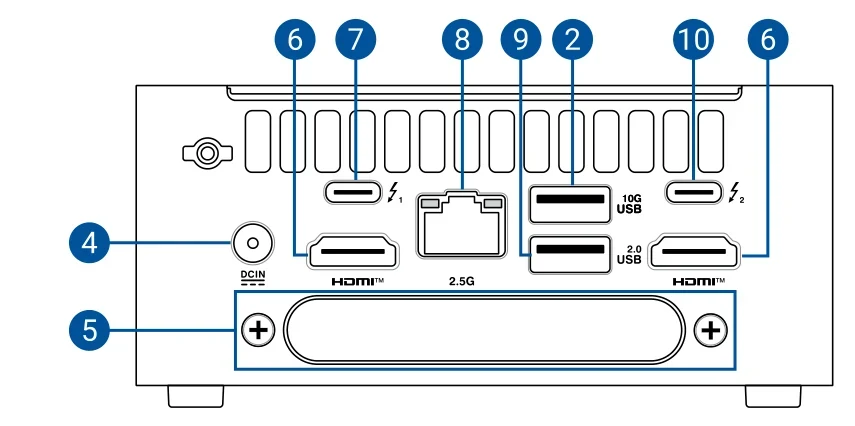
That is useful if retaining a serial peripheral or adding a network connection is part of the migration. It is not evidence that every storage, LAN and COM accessory can be mounted together in any combination. Confirm the exact supported module arrangement when two requirements compete for the expansion area.
The storage-expansion instructions describe an alternative plastic faceplate with a COM opening. That opening alone does not establish a complete working storage-plus-LAN-plus-COM configuration. A faceplate, the required controller or module, its cables and a supported installation are different items.
For a normal single-network-port build, the standard 2.5GbE connection may already meet the requirement. Buy the extra module for an actual need rather than treating the tall case's blanking plate as missing equipment that must be filled.
6. Include the Correct Power Adapter, Regional Cord and Mounting Parts
ASUS's Kit accessory list includes an AC adapter, a region-dependent power cord, VESA bracket and screws, cable clip and printed documents. Some SKUs omit the power cord. Check the actual box contents for the unit and market you are ordering, especially if it is being compared with a bare-board listing.
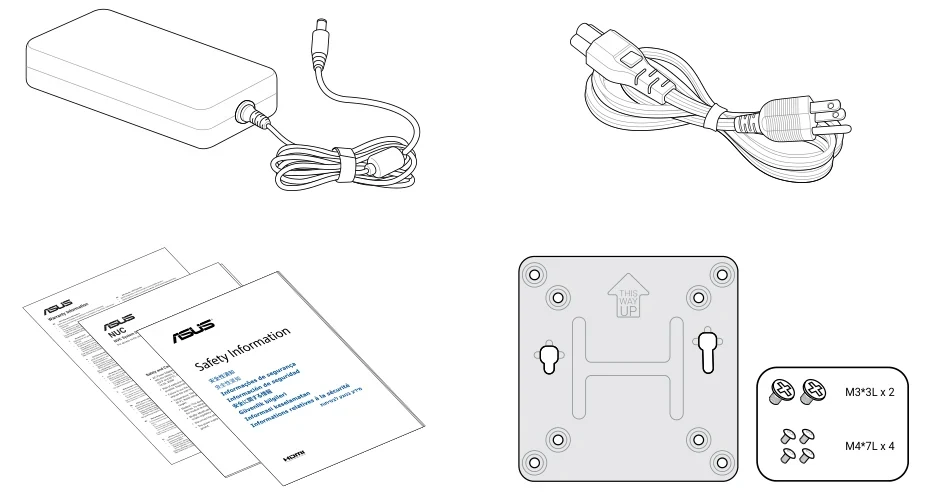
The V3 guide gives the precise power grouping:
- Core 3 100U and Core 5 120U: 19V, 4.74A, 90W.
- Core 5 210H, Core 7 240H, Core Ultra 5 225H/235H and Core Ultra 7 255H/265H: 19V, 6.32A, 120W.
The shorter website wording associates 90W with “i3,” but the V3 guide explicitly includes Core 5 120U in that group. Conversely, that does not put every Core 5 model on the 90W adapter. Use the correct supplied adapter for the exact unit rather than choosing from the family name or case height.
A retained power brick should not be assumed suitable merely because its plug appears similar. Match the required electrical specification and actual connector to the system; do not substitute a desktop PSU or infer USB-C power input from the front connector. The documented system input is the rear DC jack.
If you intend to mount the Kit behind a monitor, include the actual bracket, screws and cable clearance in the plan. A retained VESA mounting arrangement still needs to suit the new enclosure rather than being treated as another automatic transfer.
7. Retain Peripherals from the Port Map, Not the Type-C Shape
Both heights provide a front USB 20Gbps Type-C port and two USB 10Gbps Type-A ports. The rear includes two Thunderbolt 4 Type-C ports with DisplayPort 2.1, two HDMI outputs, one USB 10Gbps Type-A port, one USB 2.0 Type-A port, Ethernet and DC input. The rear hardware view shown here is the slim model; the tall model's expansion faceplate is an additional physical feature below its standard ports.
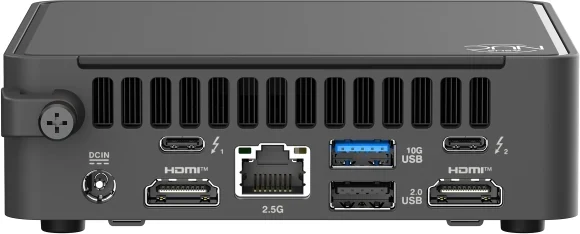
ASUS specifies the HDMI outputs as HDMI 2.1 TMDS-compatible, 4K at 60Hz. Use those actual limits when checking retained monitor cables and displays. A general HDMI version label or a series-level multi-display claim is not permission to assume every resolution and refresh-rate combination.
Likewise, the front Type-C port's data specification is not the same as the rear Thunderbolt ports' feature set. List the actual protocol needed by an external SSD, dock or display connection. Keep data speed, video and charging requirements separate when deciding which existing cables and peripherals can remain.
The Kit specification lists Wi-Fi 7 module options, whereas the bare-board column says no wireless card is installed. Check the chosen Kit's exact configuration; do not copy the board-only omission into the Kit's replacement-parts bill.
8. Choose from One Complete Retained-parts List
For a suitable SODIMM pair, one 2280 SSD and one 2242 SSD, start by comparing the two Kits' exact processors and complete package prices. If the standard connections satisfy the build, slim can avoid buying height for an unused expansion option. Tall remains a choice when a confirmed module requirement justifies it.
For two retained 2280 SSDs, evaluate the tall Kit with its separately purchased storage-expansion assembly. Keep the second path's Gen 4 link and the loss of the 2242 position in that decision. If you also need LAN or COM expansion, resolve the exact accessory combination before ordering.
Your final bill should include the Kit's precise CPU configuration, compatible memory, the two assigned SSDs, any required complete expansion kit, the correct power adapter and regional cord, mounting hardware, and the planned OS installation and drivers. A retained SSD does not by itself make an empty Kit a ready-to-use software installation.
Choose the package that preserves the parts you actually have in a documented arrangement. Neither the taller enclosure nor a Core Ultra label turns every spare SSD, compact memory module or expansion accessory into usable capacity.